
With the ground floor structure finished, it was on the the first floor. I was really surprised how fast things were going at this point as it was only the start of day two of work! After a little consideration I decided to lay the floor before placing the posts for the walls - it just seemed easier than cutting the floor around the posts. The floor is made from three strips of 4mm thick balsa wood with a faux floorboard effect.

The floorboard look was achieved by using a ballpoint pen with no ink left in it. By running the pen over the balsa wood - just as though I you were drawing a line only pressing a little harder - you can create grooves that make the one piece of wood look like separate boards. This works just fine as long as you go with the grain of the wood. When you have to go accross the grain, be careful and always press gently or the wood will splinter. Once the wood for the floor was 'boarded' on both the top and bottom (the floor is also the dowstairs ceiling)it was stained and varnished. Lastly, using a pen with some ink in it this time I drew on the 'nails' at the ends of each board and applied another coat of varnish. The floor was then fitted in place over the ground floor beams.
The posts and beams for the first floor were fitted in the same way as those for the ground floor. Rather than repeat myself, I'll just refer you to my earlier post The Bakery - Stage Two - Part One. The only difference here is that the majority of the posts are balsa wood rather than hard wood, mainly on account of the fact I was running short on the hard wood. The top floor/attic was constructed in the same way as the first floor with the floor being laid first, then the posts added. The differences were that a 'hole' was left in the floor for access from the lower level and that the posts, instead of going straight up, were angle together to form an 'A'. I thought very carefully about the angle of the 'A'. If it was too shallow, there would be no room inside, if it were too steep, the house would become too tall. From memory (and keep in mind I'm trying to remember more than a week - quite a hard ask) the angle I chose in the end was about 55 degrees. Whatever it actually was, it leaves a reasonable amount of 'head room' inside without being too high. Unfortunately, my vague plans of putting a grand four poster or half tester bed on the top floor probably won't work out, but then I don't suppose the miniature people could have carried such a big, bulky bed up all those stairs anyway!
Next came the chimney and the walls. The chimney is merely cardboard painted mortar grey and then 'bricked' with my brick stencil and paste mixture. The bricks
should be the same colour as the bricks in the basement block, but I ran out of that mixture back when I finished the basement's brickwork and there is no chance that I could ever mix the exact same colour again. Rather than spend hours trying to match the exact colour, I just mixed a reddish colour and hoped no one would notice. Perhaps the basement structure was already there when the house above was built, and so two different bricks were used? Perhaps a fire burned down the original structure? In any event, the chimney bricks are a much better colour than the basement bricks.

While waiting for the sections of chimney to dry, I cut out the remaining walls. They were then given a thin coat of texture paste to resemble rough plaster. I prefer texture paste to something like polyfilla as it remains flexible when dry, unlike polyfilla which crumbles all too easily. The inside side of the walls were painted 'soft white'. For the outside, I didn't want to go with white -
EVERYBODY makes white tudor style houses and I like what I do to be a little different. I have seen tudor houses painted soft yellow and light terracotta and thought it might try one of those colours, but soon discovered they clashed with the very pink basement bricks (that were supposed to be an orangey-red). I the end I chose a very pale lavender for the walls - it tones well with the pinkish bricks even if it is a long, long way from being an authentic colour.
When finished both the chimney and most of the walls were glued in place. I cut 'window holes' in the three remaining walls before they too were put in place.
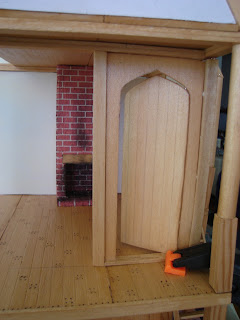
Doors came next. Naturally, all three places I intended to put doors I had made different sizes requiring me to make three different-but-identical templates. The doors are again balsa wood, each door and it's surround cut from a single piece. I used the same technique on the doors as I did on the floors to make them look like they were made from a number planks. The doors open and close by pivoting on pins that pass through the top and bottom of the frame. Later on, I'll add some hinges and other door furniture to give the impression they work more like normal doors. The 'shop windows' on the ground floor were made and work in much the same way except they go up and down rather than in and out.
With the doors in place I went to work on the windows. I stared each window with a basic rectangular frame that fitted exactly the hole in the wall left for it. For the large windows I added 'crossbars' inside the frame. Next I cut an acetate sheet to the same size a the frames and using faux leadlighting outliner in a pewter colour and a pattern drawn on a piece of graph paper to create the 'glass' for the windows. Once dry, the glass pannels were glued to the inside of the window frames and the windows glued in place in the house.
Next came the fake beams on the walls that give the impression of an authentic tudor style building. I started with the strips around the windows as these help hold the windows in place. I then went on to add them on all the remaining walls, inside and out.

Now we've almost caught up to where I am at the moment. I have cut out pieces of foam board for the roof, but am yet to decied whether to thatch or tile the roof and how to best achieve either effect. To finish the 'construction' phase of the house I also still need to add the balcony railing, the internal stairs, fake ceiling beams and a few decorative brackets. Then it will be on to the furniture, accessories and people!

 With the ground floor structure finished, it was on the the first floor. I was really surprised how fast things were going at this point as it was only the start of day two of work! After a little consideration I decided to lay the floor before placing the posts for the walls - it just seemed easier than cutting the floor around the posts. The floor is made from three strips of 4mm thick balsa wood with a faux floorboard effect.
 The floorboard look was achieved by using a ballpoint pen with no ink left in it. By running the pen over the balsa wood - just as though I you were drawing a line only pressing a little harder - you can create grooves that make the one piece of wood look like separate boards. This works just fine as long as you go with the grain of the wood. When you have to go accross the grain, be careful and always press gently or the wood will splinter. Once the wood for the floor was 'boarded' on both the top and bottom (the floor is also the dowstairs ceiling)it was stained and varnished. Lastly, using a pen with some ink in it this time I drew on the 'nails' at the ends of each board and applied another coat of varnish. The floor was then fitted in place over the ground floor beams.
The posts and beams for the first floor were fitted in the same way as those for the ground floor. Rather than repeat myself, I'll just refer you to my earlier post The Bakery - Stage Two - Part One. The only difference here is that the majority of the posts are balsa wood rather than hard wood, mainly on account of the fact I was running short on the hard wood. The top floor/attic was constructed in the same way as the first floor with the floor being laid first, then the posts added. The differences were that a 'hole' was left in the floor for access from the lower level and that the posts, instead of going straight up, were angle together to form an 'A'. I thought very carefully about the angle of the 'A'. If it was too shallow, there would be no room inside, if it were too steep, the house would become too tall. From memory (and keep in mind I'm trying to remember more than a week - quite a hard ask) the angle I chose in the end was about 55 degrees. Whatever it actually was, it leaves a reasonable amount of 'head room' inside without being too high. Unfortunately, my vague plans of putting a grand four poster or half tester bed on the top floor probably won't work out, but then I don't suppose the miniature people could have carried such a big, bulky bed up all those stairs anyway!
Next came the chimney and the walls. The chimney is merely cardboard painted mortar grey and then 'bricked' with my brick stencil and paste mixture. The bricks should be the same colour as the bricks in the basement block, but I ran out of that mixture back when I finished the basement's brickwork and there is no chance that I could ever mix the exact same colour again. Rather than spend hours trying to match the exact colour, I just mixed a reddish colour and hoped no one would notice. Perhaps the basement structure was already there when the house above was built, and so two different bricks were used? Perhaps a fire burned down the original structure? In any event, the chimney bricks are a much better colour than the basement bricks.
The floorboard look was achieved by using a ballpoint pen with no ink left in it. By running the pen over the balsa wood - just as though I you were drawing a line only pressing a little harder - you can create grooves that make the one piece of wood look like separate boards. This works just fine as long as you go with the grain of the wood. When you have to go accross the grain, be careful and always press gently or the wood will splinter. Once the wood for the floor was 'boarded' on both the top and bottom (the floor is also the dowstairs ceiling)it was stained and varnished. Lastly, using a pen with some ink in it this time I drew on the 'nails' at the ends of each board and applied another coat of varnish. The floor was then fitted in place over the ground floor beams.
The posts and beams for the first floor were fitted in the same way as those for the ground floor. Rather than repeat myself, I'll just refer you to my earlier post The Bakery - Stage Two - Part One. The only difference here is that the majority of the posts are balsa wood rather than hard wood, mainly on account of the fact I was running short on the hard wood. The top floor/attic was constructed in the same way as the first floor with the floor being laid first, then the posts added. The differences were that a 'hole' was left in the floor for access from the lower level and that the posts, instead of going straight up, were angle together to form an 'A'. I thought very carefully about the angle of the 'A'. If it was too shallow, there would be no room inside, if it were too steep, the house would become too tall. From memory (and keep in mind I'm trying to remember more than a week - quite a hard ask) the angle I chose in the end was about 55 degrees. Whatever it actually was, it leaves a reasonable amount of 'head room' inside without being too high. Unfortunately, my vague plans of putting a grand four poster or half tester bed on the top floor probably won't work out, but then I don't suppose the miniature people could have carried such a big, bulky bed up all those stairs anyway!
Next came the chimney and the walls. The chimney is merely cardboard painted mortar grey and then 'bricked' with my brick stencil and paste mixture. The bricks should be the same colour as the bricks in the basement block, but I ran out of that mixture back when I finished the basement's brickwork and there is no chance that I could ever mix the exact same colour again. Rather than spend hours trying to match the exact colour, I just mixed a reddish colour and hoped no one would notice. Perhaps the basement structure was already there when the house above was built, and so two different bricks were used? Perhaps a fire burned down the original structure? In any event, the chimney bricks are a much better colour than the basement bricks.
 While waiting for the sections of chimney to dry, I cut out the remaining walls. They were then given a thin coat of texture paste to resemble rough plaster. I prefer texture paste to something like polyfilla as it remains flexible when dry, unlike polyfilla which crumbles all too easily. The inside side of the walls were painted 'soft white'. For the outside, I didn't want to go with white - EVERYBODY makes white tudor style houses and I like what I do to be a little different. I have seen tudor houses painted soft yellow and light terracotta and thought it might try one of those colours, but soon discovered they clashed with the very pink basement bricks (that were supposed to be an orangey-red). I the end I chose a very pale lavender for the walls - it tones well with the pinkish bricks even if it is a long, long way from being an authentic colour.
When finished both the chimney and most of the walls were glued in place. I cut 'window holes' in the three remaining walls before they too were put in place.
Doors came next. Naturally, all three places I intended to put doors I had made different sizes requiring me to make three different-but-identical templates. The doors are again balsa wood, each door and it's surround cut from a single piece. I used the same technique on the doors as I did on the floors to make them look like they were made from a number planks. The doors open and close by pivoting on pins that pass through the top and bottom of the frame. Later on, I'll add some hinges and other door furniture to give the impression they work more like normal doors. The 'shop windows' on the ground floor were made and work in much the same way except they go up and down rather than in and out.
While waiting for the sections of chimney to dry, I cut out the remaining walls. They were then given a thin coat of texture paste to resemble rough plaster. I prefer texture paste to something like polyfilla as it remains flexible when dry, unlike polyfilla which crumbles all too easily. The inside side of the walls were painted 'soft white'. For the outside, I didn't want to go with white - EVERYBODY makes white tudor style houses and I like what I do to be a little different. I have seen tudor houses painted soft yellow and light terracotta and thought it might try one of those colours, but soon discovered they clashed with the very pink basement bricks (that were supposed to be an orangey-red). I the end I chose a very pale lavender for the walls - it tones well with the pinkish bricks even if it is a long, long way from being an authentic colour.
When finished both the chimney and most of the walls were glued in place. I cut 'window holes' in the three remaining walls before they too were put in place.
Doors came next. Naturally, all three places I intended to put doors I had made different sizes requiring me to make three different-but-identical templates. The doors are again balsa wood, each door and it's surround cut from a single piece. I used the same technique on the doors as I did on the floors to make them look like they were made from a number planks. The doors open and close by pivoting on pins that pass through the top and bottom of the frame. Later on, I'll add some hinges and other door furniture to give the impression they work more like normal doors. The 'shop windows' on the ground floor were made and work in much the same way except they go up and down rather than in and out.
 With the doors in place I went to work on the windows. I stared each window with a basic rectangular frame that fitted exactly the hole in the wall left for it. For the large windows I added 'crossbars' inside the frame. Next I cut an acetate sheet to the same size a the frames and using faux leadlighting outliner in a pewter colour and a pattern drawn on a piece of graph paper to create the 'glass' for the windows. Once dry, the glass pannels were glued to the inside of the window frames and the windows glued in place in the house.
Next came the fake beams on the walls that give the impression of an authentic tudor style building. I started with the strips around the windows as these help hold the windows in place. I then went on to add them on all the remaining walls, inside and out.
With the doors in place I went to work on the windows. I stared each window with a basic rectangular frame that fitted exactly the hole in the wall left for it. For the large windows I added 'crossbars' inside the frame. Next I cut an acetate sheet to the same size a the frames and using faux leadlighting outliner in a pewter colour and a pattern drawn on a piece of graph paper to create the 'glass' for the windows. Once dry, the glass pannels were glued to the inside of the window frames and the windows glued in place in the house.
Next came the fake beams on the walls that give the impression of an authentic tudor style building. I started with the strips around the windows as these help hold the windows in place. I then went on to add them on all the remaining walls, inside and out.
 Now we've almost caught up to where I am at the moment. I have cut out pieces of foam board for the roof, but am yet to decied whether to thatch or tile the roof and how to best achieve either effect. To finish the 'construction' phase of the house I also still need to add the balcony railing, the internal stairs, fake ceiling beams and a few decorative brackets. Then it will be on to the furniture, accessories and people!
No comments:
Post a Comment